What is Angular?
A framework for building client application in HTML, CSS and JavaScript/TypeScript.
Why Angular?
Why we need to learn Angular? We can do the same in JavaScript or jQuery. Yes, we can complete our most of the task using jQuery.
When the application becomes complex in terms of requirements, jQuery becomes hard to maintain the code. Even though we have lots of design patterns for JavaScript, its hard for beginner to start with design patterns.
When we create large complex application using jQuery – it becomes hard to test. To make life easier a lots of frameworks arrived in programming world to help the programmers.
Benefits of Angular
- Its a component based framework which gives a clean structure for our application
- It has Declarative templates which Includes lots of re-usable code
- More testable code – supports to build lots of automated test
- Dependency Injection – loads dependent objects (called the dependencies) when it creates an instance of an object.
- We can write our code in either JavaScript or TypeScript – Angular Framework itself developed using TypeScript
Action Plan
In this tutorial, we are going to explore the basic concepts of angular first – step by step. And then we can move on to the advanced topics later on.
The plan is to help someone who are really new to angular. Beginners needs some simple step by step tutorial at the early stage. So we will discuss the basic concepts with code at first.
We are going to cover following topics in entire course. And I’m planning to add videos tutorial as well simultaneously. The action plan skeleton is
Introduction to the course
What is Angular?
Architecture of Angular
We have two main sections in Architecture
- Front-end
- Back-end
Front-end
In the front-end, we have built our UI using HTML, CSS, JavaScript or TypeScript. It contains HTML templates, Graphical representation, application presentation logic.
Back-end
Back-end Architecture contains the Business Logic, Data from Database or APIs.
In angular, we are not going to store any data in client side because once the session or cookies cleared everything will deleted.
We will use local storage or cookies in client side to store temporary data. The business logic or data are stored in database or APIs.

The key parts available in angular architecture are
- Modules
- Components
- Templates
- Directives
- Data Binding
- Services
- Dependency Injection
We can discuss on each topic in upcoming posts.

Setting up the Environment
In this post, we are going to discuss how to setup development environment and create an initial angular app using CLI.
A quick start tool is always helps the developer to save their valuable time and use those time in efficient way on improving the quality of the application.
Angular provides us Angular CLI which is a command line interface tool that can help to create a project, add files, and perform a variety of ongoing development tasks such as testing, bundling, and deployment.
Using this CLI, we can create apps with a working condition which uses best practices suggested by Angular Team.
To create an Angular application using Angular CLI, all we need is to follow the below steps:
1. Install Node js and npm on your machine
Visit Node.js web page and download installer. Once you’ve installed nodejs, the npm will get installed along with it.
2. Verify the compatible version
Angular CLI requires the minimal version of node and npm. But feel free to install the latest edition to explore the latest features.
We can check the version of node and npm using following commands.
node -v
npm -v
3. Install Angular CLI
Run the following command to install Angular CLI globally.
npm install -g @angular/cli
-g flag is used to install the package globally in the npm.
Once we installed CLI globally, we can confirm whether the tool installed successfully by using the following command.
ng -v
StackBlitz
StackBlitz is an online IDE where you can create Angular & React projects that are immediately online & shareable via link… in just one click. It automatically takes care of installing dependencies, compiling, bundling, and hot reloading as you type.
StackBlitz is a tool in the Cloud IDE category of a tech stack.
Read more here for StackBlitz docs.
Additional Reading
Just read this if you really want to get deep insight about npm
As a part of learning angular, I would suggest everyone learn and understand the basic concept of npm
Maybe by finding answers for few of questions listed below
- What is npm?
- What is the role of npm?
- How to use it?
- Why we are going to use it?
So, what is npm?
npm – node package manager
Let’s split the sentence and understand the meaning present in the abbreviation.
Node
Here node.js is mentioned as the node. Node.js is a server-side JavaScript environment. It uses an asynchronous event-driven model and is designed for writing scalable Internet applications, notably web servers.
Package
Modules of code grouped up into a component which can be used in various project or application.
Manager
Managing the dependencies with the various operation like install, uninstall, update and so on.
Now, we can frame our own definition for npm from above split up an explanation. So using npm, we can manage (install, uninstall, organize) the node.js packages in our project.
npm is a package manager for the JavaScript programming language. It is the default package manager for the JavaScript runtime environment Node.js.
npm has CLI terminal and website to search for packages.
What is the role of npm?
npm does N number of roles in various projects. I’m just mentioning the various steps which we are going to use in our upcoming posts in the end user developer point of view
- install packages
- uninstall packages
- version maintenance of packages across the team
- maintaining the dependencies
How to use it?
Simple, install Node.js
npm is distributed with Node.js- which means that when we download and install Node.js, we automatically get npm installed on our computer.
Using following command in terminal, we can check whether our toolset get installed successfully,
// to check node.js version
node -v

// to check npm version
npm -v
packages.json
What is this packages.json? this is one of the important things we should get familiar if we are going for use npm in our projects.
- packages.json file is like the registry of packages in our project.
- it lists the packages that our project depends on.
- allows us to specify the versions of a package that our project can use using semantic versioning rules.
How to create packages.json file?
Open terminal with your target folder location.
Type npm init and Enter, now you’ll be caught up with few questions. After you have answered most of the question, your file will get created.
name and version fields are mandatory fields.

If you are afraid of questions, we have another quick option.
Enter command npm init –yes

Using –yes argument option, the npm will create packages.json file with default values.
Install a package
npm install (in the package directory, no arguments) – Install the dependencies in the local node_modules folder.
In global mode (ie, with -g or --global appended to the command), it installs the current package context (ie, the current working directory) as a global package.
You can find detailed details of npm install options in this link
A package can be downloaded with the command:
npm install <package_name>
The --save and --save-dev install flags
The easier (and more awesome) way to add dependencies to your package.json is to do from the command line, flagging the npm install command with either --save or --save-dev, depending on how you’d like to use that dependency.
To add an entry to your package.json‘s dependencies:
npm install <package_name> --save
To add an entry to your package.json‘s devDependencies:
npm install <package_name> --save-dev
That’s it. Few lines have been copied from official documentation. :p
Let’s conclude, using npm we can manage number of packages in our projects easily.
Angular CLI
Angular CLI is one of the best tool available for angular to setup the initial files or scaffolding structure of the application.
Setup
Once you have setup the basic software like node.js and npm. You can download CLI using the following command
npm install -g @angular/cli
Once installed we can check the version of angular CLI using the following command
ng version
One common arguments every CLI has is help command. Here it is for you
ng help
Create new Angular App
From your target empty folder, you need to run the following command to generate the basic files/
ng new my-first-project
Make sure to replace ‘my-first-project’ with name you prefer. This is will your application name.
Angular CLI have lots of others option to help in setting the basic to advance files.
Available angular CLI commands
Available angular CLI commands By using command ng help, I’m getting the following information
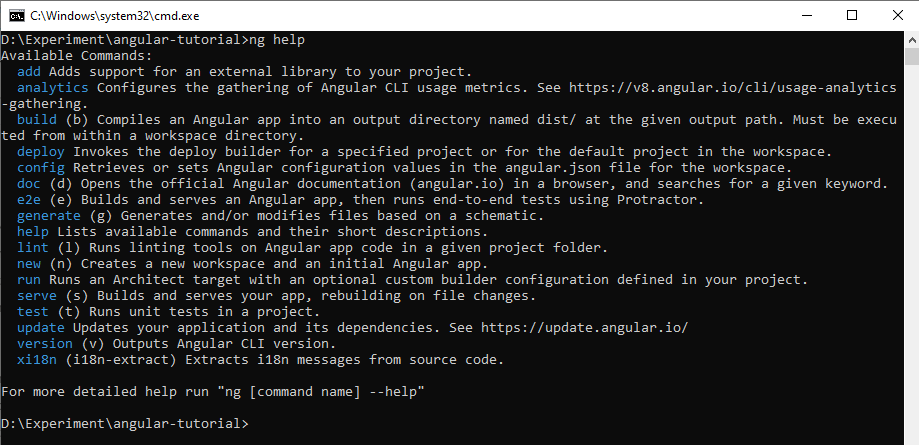
- add – Adds support for an external library to your project.
- analytics – Configures the gathering of Angular CLI usage metrics. See https://v8.angular.io/cli/usage-analytics-gathering.
- build (b) – Compiles an Angular app into an output directory named dist/ at the given output path. Must be executed from within a workspace directory.
- deploy – Invokes the deploy builder for a specified project or for the default project in the workspace.
- config – Retrieves or sets Angular configuration values in the angular.json file for the workspace.
- doc (d) – Opens the official Angular documentation (angular.io) in a browser, and searches for a given keyword.
- e2e (e) – Builds and serves an Angular app, then runs end-to-end tests using Protractor.
- generate (g) – Generates and/or modifies files based on a schematic.
- help – Lists available commands and their short descriptions.
- lint (l) – Runs linting tools on Angular app code in a given project folder.
- new (n) – Creates a new workspace and an initial Angular app.
- run – Runs an Architect target with an optional custom builder configuration defined in your project.
- serve (s) – Builds and serves your app, rebuilding on file changes.
- test (t) – Runs unit tests in a project.
- update – Updates your application and its dependencies. See https://update.angular.io/
- version (v) – Outputs Angular CLI version.
- xi18n (i18n-extract) – Extracts i18n messages from source code.
Creating new angular project
ng new timer-project
timer-project is name of project we chose.
The CLI asks us choose our required options based on our needs. Like routing and stylesheet type.
After installing package, we are good to go with debugging of the newly generated application. We can discuss about the project structure in our upcoming post.
You can checkout some of our other posts related to angular CLI
Serving the project
Angular CLI provides a complete tool-chain for developing front-end apps on your local machine. As such, you don’t need to install a local server to serve your project — you can simply, use the ng serve command from your terminal to serve your project locally.
ng serveThe application will start serving in the root http://localhost:4200
Generating angular schematic
Generates and/or modifies files based on a schematic.
ng generate <schematic> [options]
ng g <schematic> [options]
schematic can be replaced with following sets
- appShell
- application
- class
- component
- directive
- enum
- guard
- interceptor
- interface
- library
- module
- pipe
- service
- serviceWorker
- webWorker
These commands is fair to start using angular CLI in beginner mode.
Your First Angular App
Structure of Angular Project
In the previous post, we have discussed how to create hello world application in angular. Using Angular CLI, we have generated basic files needed to run a hello world application.
Now, let’s have a quick look at the files and folders in our new Angular project.
The generated projects have the following files and folders structure
The top level of the workspace contains workspace-wide configuration files, configuration files for the root-level application, and subfolders for the root-level application source and test files.

| WORKSPACE CONFIG FILES | PURPOSE |
|---|---|
.editorconfig | Configuration for code editors. See EditorConfig. |
.gitignore | Specifies intentionally untracked files that Git should ignore. |
README.md | Introductory documentation for the root app. |
angular.json | CLI configuration defaults for all projects in the workspace, including configuration options for build, serve, and test tools that the CLI uses, such as TSLint, Karma, and Protractor. For details, see Angular Workspace Configuration. |
package.json | Configures npm package dependencies that are available to all projects in the workspace. See npm documentation for the specific format and contents of this file. |
package-lock.json | Provides version information for all packages installed into node_modules by the npm client. See npm documentation for details. If you use the yarn client, this file will be yarn.lock instead. |
src/ | Source files for the root-level application project. |
node_modules/ | Provides npm packages to the entire workspace. Workspace-wide node_modules dependencies are visible to all projects. |
tsconfig.json | Default TypeScript configuration for projects in the workspace. |
tslint.json | Default TSLint configuration for projects in the workspace. |
Application source files
Files at the top level of src/ support testing and running your application. Subfolders contain the application source and application-specific configuration.
| APP SUPPORT FILES | PURPOSE |
|---|---|
app/ | Contains the component files in which your application logic and data are defined. See details below. |
assets/ | Contains image and other asset files to be copied as-is when you build your application. |
environments/ | Contains build configuration options for particular target environments. By default there is an unnamed standard development environment and a production (“prod”) environment. You can define additional target environment configurations. |
favicon.ico | An icon to use for this application in the bookmark bar. |
index.html | The main HTML page that is served when someone visits your site. The CLI automatically adds all JavaScript and CSS files when building your app, so you typically don’t need to add any <script> or<link> tags here manually. |
main.ts | The main entry point for your application. Compiles the application with the JIT compiler and bootstraps the application’s root module (AppModule) to run in the browser. You can also use the AOT compiler without changing any code by appending the --aot flag to the CLI build and serve commands. |
polyfills.ts | Provides polyfill scripts for browser support. |
styles.sass | Lists CSS files that supply styles for a project. The extension reflects the style preprocessor you have configured for the project. |
test.ts | The main entry point for your unit tests, with some Angular-specific configuration. You don’t typically need to edit this file. |
Inside the src/ folder, the app/ folder contains your project’s logic and data. Angular components, templates, and styles go here.

SRC/APP/ FILES | PURPOSE |
|---|---|
app/app.component.ts | Defines the logic for the app’s root component, named AppComponent. The view associated with this root component becomes the root of the view hierarchy as you add components and services to your application. |
app/app.component.html | Defines the HTML template associated with the root AppComponent. |
app/app.component.css | Defines the base CSS stylesheet for the root AppComponent. |
app/app.component.spec.ts | Defines a unit test for the root AppComponent. |
app/app.module.ts | Defines the root module, named AppModule, that tells Angular how to assemble the application. Initially declares only the AppComponent. As you add more components to the app, they must be declared here. |
Application configuration files
The application-specific configuration files for the root application reside at the workspace root level. For a multi-project workspace, project-specific configuration files are in the project root, under projects/project-name/.
Project-specific TypeScript configuration files inherit from the workspace-wide tsconfig.json, and project-specific TSLint configuration files inherit from the workspace-wide tslint.json.
| APPLICATION-SPECIFIC CONFIG FILES | PURPOSE |
|---|---|
browserslist | Configures sharing of target browsers and Node.js versions among various front-end tools. See Browserslist on GitHub for more information. |
karma.conf.js | Application-specific Karma configuration. |
tsconfig.app.json | Application-specific TypeScript configuration, including TypeScript and Angular template compiler options. See TypeScript Configuration and Angular Compiler Options. |
tsconfig.spec.json | TypeScript configuration for the application tests. See TypeScript Configuration. |
tslint.json | Application-specific TSLint configuration. |
Reference
https://angular.io/guide/file-structure
Yet to be added….!
Decorators
Life-cycle
Components
Templates
Directives
Services
Dependency Injection
Learning Approach
When you are following this course, try the top down approach to learn the concepts.
Once you are confident with the concepts, you can go to any topics to brush your knowledge.
Each and every topic will be covered in upcoming posts and hyperlinked will be added in the above topics.
What about Intermediate or Experts?
If you are already familiar with angular, these sessions can act as brush up session for you to revisit the technology.
We are planning to add more tutorials on angular later on to cover intermediate and expert audience.
Our plan is to build
- CRUD application tutorial in angular
- Full stack application in angular
- Performance optimization sessions.
How to reach?
If you have doubts while trying out the concepts or any errors in your code. Feel free to add comments in respective post or tweet me in the twitter.
If you are learning angular using this post, please let me that you are here.
Its kind of sending virtual HI to me! Add a comment in comments section below or send me a tweet.
Hey, @pandiyan_cool I’m just checking out your angular tutorial course. So thought to send you a virtual hi 🙂
Tweet
Happy Coding!

4 thoughts on “Angular 9 Tutorial for Beginners: Action Plan”