On September 2018, .NET Core preview 2 has been released. Dot Net team keeping the Web API improvements as a major theme for this release.
The aim of web API improvements is to make API
- Easier to create
- Easier test and debug
- Easier to document
- Easier to consume
- Easier to secure
- Easier to monitor
API becomes part of a major software application, this release got major improvements to develop APIs and services.
In this post, we shall discuss the improvements made to APIs in terms of creating, debugging and testing.
We can build an API from scratch and let’s view what’s new in this release.
For doing these activities, I’m using Visual studio 2017 preview 2 in my machine. So make sure you are having the similar version to experiment the same.
Create an API Project
Let’s create a new project called “APITest” using the following steps
- File -> New Project -> Choose ASP.NET Core Web Application under Web Category

- And in the next prompt select ASP.NET Core 2.2 in the topmost drop-down and click.

Now, our API gets created with the default template. We will be having a controller called ValuesController.
Additionally to that, we shall create a new controller called EventController to perform our experiments.
Model
Before creating that controller, let’s create Event model and we can generate our Controller code based on the model we create.
Our Event model will look like below,
This file contains hidden or bidirectional Unicode text that may be interpreted or compiled differently than what appears below. To review, open the file in an editor that reveals hidden Unicode characters.
Learn more about bidirectional Unicode characters
| public class Event | |
| { | |
| public int Id { get; set; } | |
| public string Organiser { get; set; } | |
| public DateTime EventDate { get; set; } | |
| } |
So, we have our Model ready now. Let’s generate our Controller based on this Model.
Controller
- Right click on Controller folder in solution explorer
- Select Add
- Click Controller
- Choose Option “API Controller with actions, using Entity Framework”
- Select Model class and DataContext using the plus symbol and Click Add
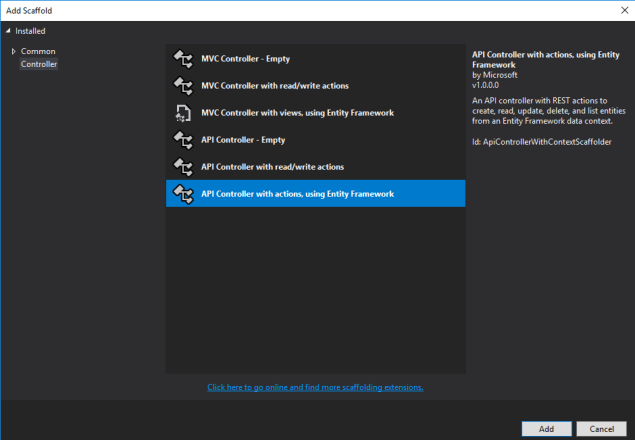

Once we have clicked the Visual studio will start scaffolding our new controller in a few seconds. And our controller will look like below
This file contains hidden or bidirectional Unicode text that may be interpreted or compiled differently than what appears below. To review, open the file in an editor that reveals hidden Unicode characters.
Learn more about bidirectional Unicode characters
| namespace APITest.Controllers | |
| { | |
| [Route("api/[controller]")] | |
| [ApiController] | |
| public class EventsController : ControllerBase | |
| { | |
| private readonly EventContext _context; | |
| public EventsController(EventContext context) | |
| { | |
| _context = context; | |
| } | |
| // GET: api/Events | |
| [HttpGet] | |
| public async Task<ActionResult<IEnumerable<Event>>> GetEvent() | |
| { | |
| return await _context.Event.ToListAsync(); | |
| } | |
| // GET: api/Events/5 | |
| [HttpGet("{id}")] | |
| public async Task<ActionResult<Event>> GetEvent(int id) | |
| { | |
| var @event = await _context.Event.FindAsync(id); | |
| if (@event == null) | |
| { | |
| return NotFound(); | |
| } | |
| return @event; | |
| } | |
| // PUT: api/Events/5 | |
| [HttpPut("{id}")] | |
| public async Task<IActionResult> PutEvent(int id, Event @event) | |
| { | |
| if (id != @event.Id) | |
| { | |
| return BadRequest(); | |
| } | |
| _context.Entry(@event).State = EntityState.Modified; | |
| try | |
| { | |
| await _context.SaveChangesAsync(); | |
| } | |
| catch (DbUpdateConcurrencyException) | |
| { | |
| if (!EventExists(id)) | |
| { | |
| return NotFound(); | |
| } | |
| else | |
| { | |
| throw; | |
| } | |
| } | |
| return NoContent(); | |
| } | |
| // POST: api/Events | |
| [HttpPost] | |
| public async Task<ActionResult<Event>> PostEvent(Event @event) | |
| { | |
| _context.Event.Add(@event); | |
| await _context.SaveChangesAsync(); | |
| return CreatedAtAction("GetEvent", new { id = @event.Id }, @event); | |
| } | |
| // DELETE: api/Events/5 | |
| [HttpDelete("{id}")] | |
| public async Task<ActionResult<Event>> DeleteEvent(int id) | |
| { | |
| var @event = await _context.Event.FindAsync(id); | |
| if (@event == null) | |
| { | |
| return NotFound(); | |
| } | |
| _context.Event.Remove(@event); | |
| await _context.SaveChangesAsync(); | |
| return @event; | |
| } | |
| private bool EventExists(int id) | |
| { | |
| return _context.Event.Any(e => e.Id == id); | |
| } | |
| } | |
| } |
So, all set with API setup. Whenever we create an API, we will run the application and open the API link in the browser window.
If it is a GET call its fine, but when we need to make POST call or something we need another set of tools to perform testing. In that case, the browser is not the best tool to perform testing in the API.
In .NET Core 2.2, a new tool called HTTP-REPL has been introduced. It’s a .NET Core global which we can install using the dotnet CLI.
HTTP-REPL is a command line tool to interact with API.
Right now, the tool is not shipped with this release. However, we install using the following steps.
How to install HTTP-REPL
Run the following command in command prompt to install in global level in your machine
dotnet tool install -g dotnet-httprepl --version 2.2.0-* --add-source https://dotnet.myget.org/F/dotnet-core/api/v3/index.json
Once installed, we can verify the installation using the following command
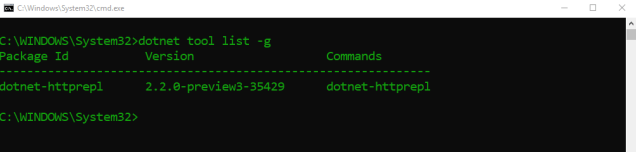
we can run http-repl using the command
dotnet httprepl
And we can point to any API which has swagger enabled to try out by setting the base URL.
Let’s not do that now, we can experiment the tool with the API which we created.
Add HTTP-REPL in Web browser list
Instead of opening the command and traversing to the API URL, we can launch our application into Repl right from our Visual Studio IDE.
For that, we need to add the Repl in the Web browser list.
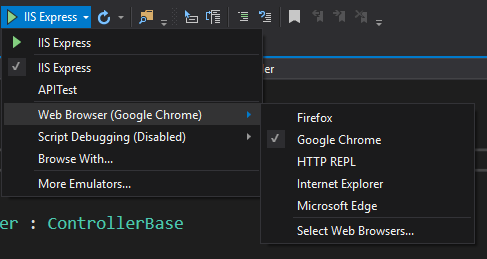
To Add in web browser list, click browse with the option and click Add and fill the required as follows.

http-repl exe will present in the following path
C:\Users\<>\.dotnet\tools\dotnet-httprepl.exe
Once added, set it as default web browser.
And update your default launchUrl as empty or remove that settings from launchSettings.json
This file contains hidden or bidirectional Unicode text that may be interpreted or compiled differently than what appears below. To review, open the file in an editor that reveals hidden Unicode characters.
Learn more about bidirectional Unicode characters
| { | |
| "$schema": "http://json.schemastore.org/launchsettings.json", | |
| "iisSettings": { | |
| "windowsAuthentication": false, | |
| "anonymousAuthentication": true, | |
| "iisExpress": { | |
| "applicationUrl": "http://localhost:32022", | |
| "sslPort": 44384 | |
| } | |
| }, | |
| "profiles": { | |
| "IIS Express": { | |
| "commandName": "IISExpress", | |
| "launchBrowser": true, | |
| "environmentVariables": { | |
| "ASPNETCORE_ENVIRONMENT": "Development" | |
| } | |
| }, | |
| "APITest": { | |
| "commandName": "Project", | |
| "launchBrowser": true, | |
| "applicationUrl": "https://localhost:5001;http://localhost:5000", | |
| "environmentVariables": { | |
| "ASPNETCORE_ENVIRONMENT": "Development" | |
| } | |
| } | |
| } | |
| } |
Launch the application
As we have added EF in our API, let’s add migration before launching the application.
Run the following command in Package Manager Console (Tools->Nuget Package Manger->Package Manager Console)
Add-Migration Initial
Update-Database
Click F5 or click IIS express in the toolbar to launch
After launching the application, we can test our API endpoint right from our Repl command prompt.
Let’s add Open API spec
To make HTTP Repl more accessible, we can add swagger Open API Spec. So that Repl will get to know the available HTTP methods and info in the application.
Let’s add swagger generation with the help open source project Swashbuckle.AspNetCore
Right click on the project and click Manage Nuget package and install Swashbuckle
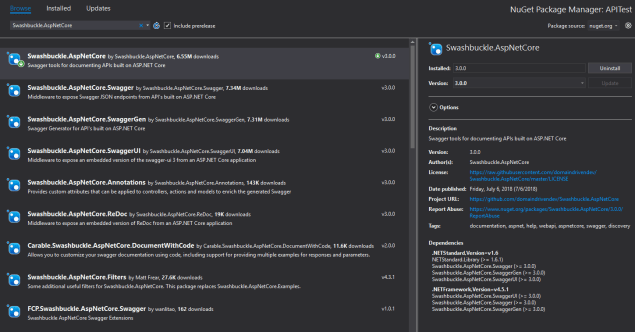
Once installed
In the ConfigureServices method of Startup.cs, register the Swagger generator, defining one or more Swagger documents.
services.AddSwaggerGen(c =>
{
    c.SwaggerDoc("v1", new Info { Title = "Events API", Version = "v1" });
});
In the Configure method, insert middleware to expose the generated Swagger as JSON endpoint(s)
app.UseSwagger();
At this point, you can spin up your application and view the generated Swagger JSON at “/swagger/v1/swagger.json.”
Optionally insert the swagger-ui middleware if you want to expose interactive documentation, specifying the Swagger JSON endpoint(s) to power it from.
app.UseSwaggerUI(c =>
{
    c.SwaggerEndpoint("/swagger/v1/swagger.json", "Events API V1");
});
All Set!!!
The command ls will list the routes API as well the HTTP methods available in that particular.

The command UI will launch the swagger UI page and open in the browser.
https://localhost:44384/api/Events~ ui

POST call
Let’s post some values using Repl. For making post calls we need to register some text or code editor.
For example, using the following command we can set a default editor
prefseteditor.command.default "C:\Windows\System32\notepad.exe"
Once we have set the default editor, we can make post call as follows by typing command POST
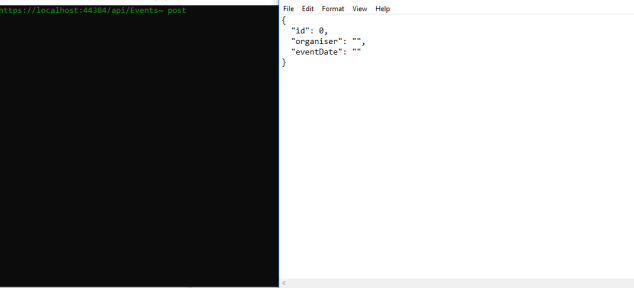
The target editor will default placeholder to fill the data, we can fill up the JSON data, save the file and close it. And also we set header with command line argument -h, the tool got some nice autocomplete feature.
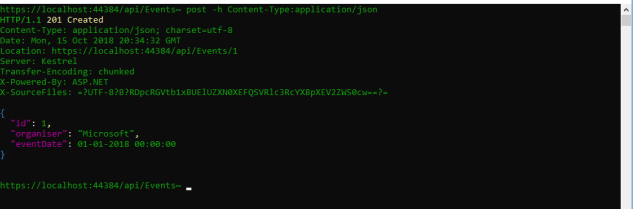
Once closed, the POST call gets called with the data we submit.
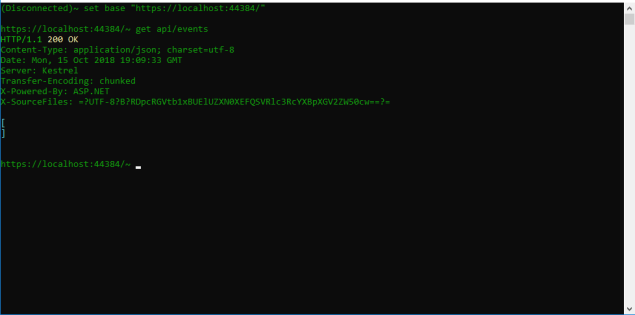
Get call
We can make GET call as follows,

Cool! That’s it for now. we can discuss API Analyzer in the next post.
Happy Coding!

2 thoughts on “What’s new in ASP.NET Core 2.2 – Web API improvements – HTTP-REPL”